大家好呀,我是猿java。
在 Spring 框架中,@Cacheable注解是什么?它有什么用途?它是如何工作的?这篇文章,我们来聊一聊。@Cacheable注解
1. @Cacheable概述
首先,我们看看@Conditional注解的源码,截图如下:

通过源码可以知道:@Cacheable表示可以缓存调用某个方法(或某个类中的所有方法)的结果的注解,它可以用在类和方法上。更具体地说,@Cacheable用于将方法的结果缓存起来,如果遇到方法并且参数都完全相同的情况,会直接从缓存中获取结果,而无需执行方法体。
@Cacheable 的工作原理如下:
1. 第一次调用:调用被 @Cacheable 注解的方法时,Spring 会先检查缓存中是否存在对应的缓存条目。
- 如果不存在,方法会被执行,且返回的结果会被存入缓存中。
- 如果存在,方法不会被执行,直接返回缓存中的结果。
2. 后续调用:每次调用时,Spring 都会基于方法的参数在缓存中查找对应的条目,存在则直接返回缓存结果,避免了重复计算或访问数据源。
2. @Cacheable 的使用
下面,我们将通过详细的示例来介绍 @Cacheable 的使用方法。
2.1 添加依赖
首先,我们需要在项目中添加 Spring 缓存相关的依赖,比如,我们使用 Spring Boot 和 Redis 作为缓存实现,这里以 Maven为例:
1
2
3
4
5
6
7
8
9
10
11
12
13
|
<dependencies>
<dependency>
<groupId>org.springframework.boot</groupId>
<artifactId>spring-boot-starter-cache</artifactId>
</dependency>
<dependency>
<groupId>org.springframework.boot</groupId>
<artifactId>spring-boot-starter-data-redis</artifactId>
</dependency>
</dependencies>
|
2.2 启用缓存
在 Spring Boot应用的启动类或配置类上添加 @EnableCaching 注解,以启用缓存支持。示例代码如下:
1
2
3
4
5
6
7
8
9
10
11
| import org.springframework.boot.SpringApplication;
import org.springframework.boot.autoconfigure.SpringBootApplication;
import org.springframework.cache.annotation.EnableCaching;
@SpringBootApplication
@EnableCaching
public class CacheableDemoApplication {
public static void main(String[] args) {
SpringApplication.run(CacheableDemoApplication.class, args);
}
}
|
2.3 使用 @Cacheable 注解
我们可以在需要缓存的方法上添加 @Cacheable 注解,并指定缓存名称。示例代码如下:
1
2
3
4
5
6
7
8
9
10
11
12
13
14
15
16
17
18
19
20
21
| import org.springframework.cache.annotation.Cacheable;
import org.springframework.stereotype.Service;
@Service
public class UserService {
@Cacheable(cacheNames = "users", key = "#userId")
public User getUserById(Long userId) {
simulateSlowService();
return new User(userId, "User" + userId);
}
private void simulateSlowService() {
try {
Thread.sleep(3000L);
} catch (InterruptedException e) {
throw new IllegalStateException(e);
}
}
}
|
在上述代码中:
cacheNames = "users":指定缓存的名称为 users。可以理解为缓存的命名空间。key = "#userId":指定缓存的键为方法参数 userId 的值。
2.4 测试缓存效果
下面,我们通过调用getUserById方法两次,第一次会经过延迟,第二次将直接从缓存中获取来进行测试。示例代码如下:
1
2
3
4
5
6
7
8
9
10
11
12
13
14
15
16
17
18
19
20
21
22
23
| import org.springframework.beans.factory.annotation.Autowired;
import org.springframework.boot.CommandLineRunner;
import org.springframework.stereotype.Component;
@Component
public class CacheTestRunner implements CommandLineRunner {
@Autowired
private UserService userService;
@Override
public void run(String... args) throws Exception {
long start = System.currentTimeMillis();
User user1 = userService.getUserById(1L);
long end = System.currentTimeMillis();
System.out.println("First call took: " + (end - start) + "ms");
start = System.currentTimeMillis();
User user2 = userService.getUserById(1L);
end = System.currentTimeMillis();
System.out.println("Second call took: " + (end - start) + "ms");
}
}
|
运行结果类似于:
1
2
| First call took: 3005ms
Second call took: 15ms
|
说明第一次调用执行了方法体并缓存了结果,第二次调用则直接从缓存中获取。
3. 属性详解
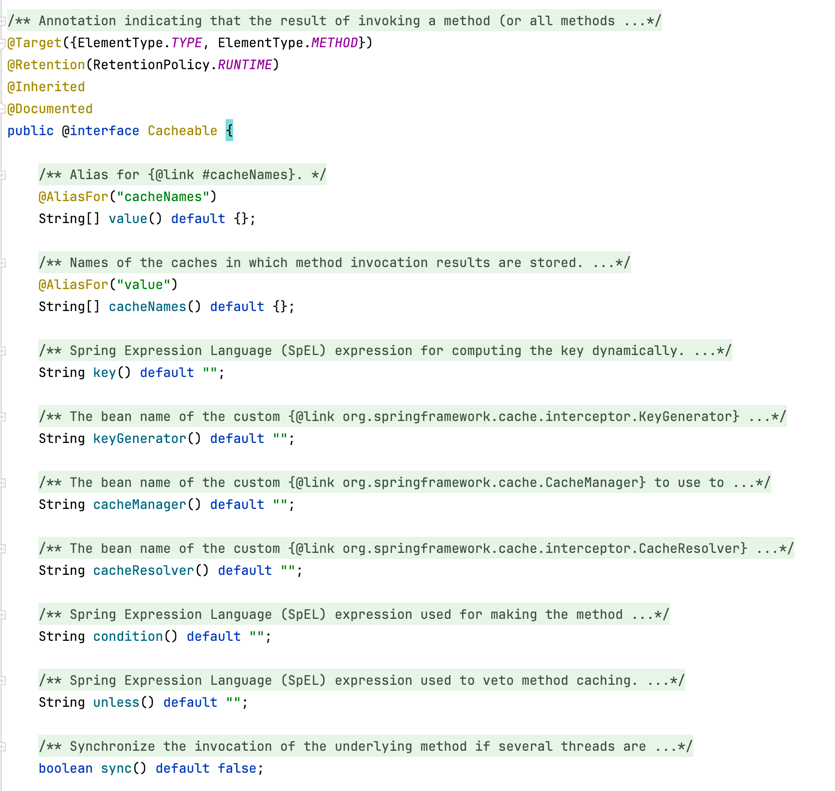
@Cacheable 注解提供了多个属性,以便更灵活地控制缓存行为,如下源码截图:

下面,我们将对主要属性进行详细的说明。
3.1 cacheNames/value
- 描述:指定缓存的名称,可以是一个或多个。
- 类型:
String[]
- 默认值:无
- 说明:
cacheNames 和 value 是同义属性,通常使用 cacheNames。指定一个缓存名称相当于指定一个命名空间,可以在配置缓存管理器时对不同名称的缓存指定不同的配置。
1
2
3
| @Cacheable(cacheNames = "users")
@Cacheable(value = "users")
|
3.2 key
- 描述:指定缓存的键。在 SpEL(Spring Expression Language)表达式中,可以使用方法参数、返回值等。
- 类型:
String
- 默认值:基于参数的所有方法参数生成的键,类似于
SimpleKey 机制。
1
2
| @Cacheable(cacheNames = "users", key = "#userId")
@Cacheable(cacheNames = "users", key = "#root.methodName + #userId")
|
#userId:使用 userId 参数作为键。#a0 或 #p0:使用第一个参数作为键。#result.id:使用方法返回值的 id 属性作为键(适用于 key 属性中的 unless)。
3.3 keyGenerator
- 描述:指定自定义的键生成器的名称。与
key 属性互斥。
- 类型:
String
- 默认值:
"cacheKeyGenerator",即使用配置的默认键生成器。
1
| @Cacheable(cacheNames = "users", keyGenerator = "myKeyGenerator")
|
1
2
3
4
5
6
7
| @Component("myKeyGenerator")
public class MyKeyGenerator implements KeyGenerator {
@Override
public Object generate(Object target, Method method, Object... params) {
return method.getName() + "_" + Arrays.stream(params).map(Object::toString).collect(Collectors.joining("_"));
}
}
|
3.4 cacheManager
- 描述:指定用于该注解的缓存管理器的名称。
- 类型:
String
- 默认值:使用配置的默认
CacheManager。
1
| @Cacheable(cacheNames = "users", cacheManager = "cacheManager1")
|
3.5 cacheResolver
- 描述:指定缓存解析器,优先级高于
cacheManager 和 cacheNames。
- 类型:
String
- 默认值:无
1
| @Cacheable(cacheResolver = "myCacheResolver")
|
3.6. condition
- 描述:使用 SpEL 表达式进行条件判断,决定是否缓存。只有表达式结果为
true 时,才进行缓存。
- 类型:
String
- 默认值:
""(总是缓存)
1
| @Cacheable(cacheNames = "users", condition = "#userId > 10")
|
上述示例中,只有当 userId 大于 10 时,才缓存结果。
3.7 unless
- 描述:与
condition 相反,用来决定是否不缓存。仅当表达式结果为 true 时,不进行缓存。
- 类型:
String
- 默认值:
""(不阻止缓存)
1
| @Cacheable(cacheNames = "users", unless = "#result == null")
|
上述示例中,只有当方法返回结果为 null 时,不缓存。
3.8 sync
- 描述:是否启用同步缓存。默认值为
false。
- 类型:
boolean
- 默认值:
false
当多个线程同时请求尚未缓存的值时,启用同步缓存可以防止多线程重复加载缓存。
1
| @Cacheable(cacheNames = "users", sync = true)
|
综合示例
1
2
3
4
5
6
7
8
9
10
| @Cacheable(
cacheNames = "users",
key = "#userId",
condition = "#userId > 10",
unless = "#result == null",
sync = true
)
public User getUserById(Long userId) {
}
|
- 缓存名称为
users
- 键为
userId
- 仅当
userId 大于 10 时缓存
- 如果返回结果为
null,则不缓存
- 启用同步缓存,防止缓存穿透导致的高并发请求重复加载
4. 配置缓存管理器
要使用 @Cacheable,需要配置一个 CacheManager,Spring 提供了多种缓存管理器的实现,如 ConcurrentMapCacheManager(基于本地 ConcurrentHashMap)、RedisCacheManager、EhCacheCacheManager 等。
4.1 使用默认的 ConcurrentMapCacheManager
如果没有特别指定,Spring Boot 会默认使用 ConcurrentMapCacheManager。适用于简单的开发和测试场景。
1
2
3
4
5
6
7
8
9
10
11
12
| import org.springframework.context.annotation.Bean;
import org.springframework.context.annotation.Configuration;
import org.springframework.cache.concurrent.ConcurrentMapCacheManager;
@Configuration
public class CacheConfig {
@Bean
public ConcurrentMapCacheManager cacheManager() {
return new ConcurrentMapCacheManager("users", "products");
}
}
|
4.2 使用 Redis 作为缓存实现
Redis 是一个高性能的内存数据库,适用于分布式应用的缓存需求。
1. 配置 Redis 连接
在 application.properties 或 application.yml 中配置 Redis 连接信息。
1
2
| spring.redis.host=localhost
spring.redis.port=6379
|
2. 配置 RedisCacheManager
1
2
3
4
5
6
7
8
9
10
11
12
13
14
15
16
17
18
19
20
21
22
23
| import org.springframework.context.annotation.Bean;
import org.springframework.context.annotation.Configuration;
import org.springframework.data.redis.cache.RedisCacheConfiguration;
import org.springframework.data.redis.cache.RedisCacheManager;
import org.springframework.data.redis.connection.RedisConnectionFactory;
import org.springframework.data.redis.serializer.RedisSerializationContext;
import java.time.Duration;
@Configuration
public class RedisCacheConfig {
@Bean
public RedisCacheManager cacheManager(RedisConnectionFactory connectionFactory) {
RedisCacheConfiguration config = RedisCacheConfiguration.defaultCacheConfig()
.entryTtl(Duration.ofMinutes(60))
.disableCachingNullValues()
.serializeValuesWith(RedisSerializationContext.SerializationPair.fromSerializer(new GenericJackson2JsonRedisSerializer()));
return RedisCacheManager.builder(connectionFactory)
.cacheDefaults(config)
.build();
}
}
|
说明:
entryTtl(Duration.ofMinutes(60)):设置缓存的默认过期时间为 60 分钟。disableCachingNullValues():不缓存 null 值。serializeValuesWith:配置缓存值的序列化方式,建议使用 JSON 序列化,便于调试和跨语言兼容。
4.3 多个缓存管理器
你可以配置多个 CacheManager,并通过 cacheManager 属性在 @Cacheable 注解中指定使用哪个缓存管理器。例如:
1
2
3
4
5
6
7
8
9
10
11
12
13
| @Configuration
public class MultipleCacheConfig {
@Bean
public CacheManager cacheManager1(RedisConnectionFactory connectionFactory) {
}
@Bean
public CacheManager cacheManager2() {
}
}
|
在 @Cacheable 中指定:
1
2
3
4
| @Cacheable(cacheNames = "users", cacheManager = "cacheManager1")
public User getUserById(Long userId) {
}
|
5. 总结
本文,我们从源码角度深度分析了 @Cacheable注解,Spring通过该注解提供了一种简洁且强大的缓存处理方式。在实际工作中,我们一定要根据实际情况来选择合适的缓存策略,另外,在使用缓存的同时,我们也需要注意缓存常见的问题,比如穿透、击穿和雪崩,并采取相应的解决措施。
6. 学习交流
如果你觉得文章有帮助,请帮忙转发给更多的好友,或关注公众号:猿java,持续输出硬核文章。


